Shock Absorbers: What They Do, When They Fail, and How to Fix Them
Did you know a worn shock absorber can double your stopping distance and make every bump feel like a pothole? Those little cylinders under your car are the unsung heroes of a comfortable ride. They control the up‑and‑down motion of your wheels, keeping the tires glued to the road and preventing the car from bouncing like a trampoline.
At its core, a shock absorber is a hydraulic or gas‑filled piston that converts kinetic energy into heat. When your wheel hits a bump, the piston pushes fluid through tiny holes, slowing the spring’s rebound. The result is a smoother, more stable ride and better tyre contact, which translates to safer steering and braking.
Most modern cars use one of two designs: twin‑tube or monotube. Twin‑tube units have a separate chamber for the oil and a reserve chamber for excess fluid, making them cheaper but a bit slower to cool. Monotube shocks have a single chamber with a high‑pressure gas charge, offering quicker response and better heat dissipation—ideal for performance cars. Knowing which type your vehicle uses helps when you shop for replacements.
So how do you know when a shock absorber is on its last legs? Look for these common signs:
- Excessive bouncing after a single bump.
- Uneven tyre wear, especially on the inner or outer edges.
- Leaking fluid or a greasy stain around the shock.
- Pulling to one side while braking or cornering.
- Clunking noises when hitting a curb or pothole.
Quick Ways to Test Your Shocks
The easiest test is the “bounce test.” Push down hard on the front or rear bumper and let go. A healthy shock will let the car settle after one or two bounces. If it keeps bouncing, you’ve got a bad absorber.
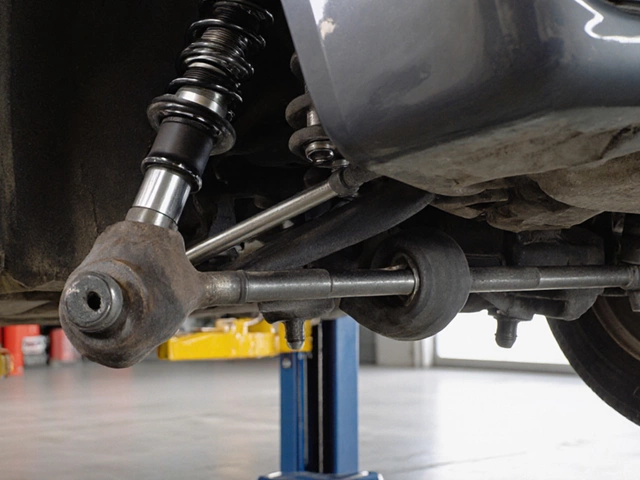
Another quick check is visual inspection. Look at each shock’s rod for dents, rust, or oil seepage. A black, oily residue usually means the seals have failed. Even if the bounce test looks OK, fluid leaks are a red flag.
For a more thorough evaluation, try the “wheel hop” test. With the car parked on level ground, rotate each wheel by hand. Any excessive play or knocking indicates worn bearings inside the shock.
DIY Replacement and Buying Tips
Changing a shock absorber isn’t rocket science, but it does need the right tools and a safe work area. You’ll need a jack, jack stands, a socket set, and possibly a spring compressor if you’re dealing with coil‑over setups. Always disconnect the battery and lift the car securely—never rely on just the jack.
Steps in a nutshell:
- Raise the vehicle and remove the wheel.
- Unbolt the upper mount (often hidden under a splash guard) and the lower mounting nut.
- Take the old shock out, noting the orientation of any bushings or brackets.
- Install the new shock, torque the mounts to the manufacturer’s specs, and re‑mount the wheel.
- Lower the car, then repeat on the opposite side for balanced handling.
When buying, match the OEM part number or use an online fit‑guide that asks for your make, model, and year. Pay attention to the spring rate and damping characteristics—replacing a sport‑tuned shock with a comfort‑grade unit can change how the car feels.
Finally, keep the suspension clean. A spray of brake cleaner on the shock’s rod and mounts removes grime that can wear out seals faster. Regularly check the tyre pressure too; under‑inflated tyres put extra stress on the shocks.
Whether you’re a weekend wrench‑turner or just want to know when to call a mechanic, understanding your shock absorbers gives you more control over ride quality and safety. Spot problems early, test them simply, and replace them right—your car will thank you with a smoother, steadier drive.

Spot the Signs: Are Your Suspension Shocks Failing?
Wondering if your car's suspension shocks are on their last legs? Discover the telltale signs of failing shocks, from that bone-rattling jolt over bumps to the unusual tire wear patterns they might cause. Learn why addressing bad suspension shocks in time can save you from more extensive repairs down the line. We share practical tips, real-world examples, and tidbits to help you diagnose issues like a pro. Better suspension means a smoother ride!
CONTINUE READINGRECENT POSTS
-

Is it Cheaper to Install Your Own Car Battery? Costs and Pros and Cons
Discover if installing your own car battery is actually cheaper. We compare DIY costs vs. professional shops, cover core charges, and explain the risks of modern car electronics.
-

Why Upgrade to Alloy Wheels? Benefits, Performance, and Style
Discover why drivers switch to alloy wheels, from improving braking and fuel efficiency to enhancing car aesthetics and resale value.